How To Get Mold Out Of Leather Car Seats: A Comprehensive Guide
Leather car seats are known to enhance the aesthetic appeal of a car, elevating its overall appearance and increasing its resale value. Whether your car came fitted with leather seats or you’ve installed them at a later stage, it is vital to clean and care for them regularly.
Part of this process involves effectively eliminating any mold that may have developed on the surface of the car seat. Leather car seats can develop mold when the vehicle interior is left moist, from food spillage, or if your leather seats were wiped down with a wet cloth without letting them dry properly.
While mold gives your leather car seats an unsightly appearance, it can also permanently damage them. Moreover, untreated mold can also become airborne and cause health problems for you and your passengers.
Safety Precautions:
Before starting the cleaning process, it is vital to take the appropriate safety precautions. This is because mold spores can be damaging to your health. You will also need to take precautions to avoid damaging your leather car seats. Therefore, please consider the following:
- Wearing protective gloves, a facemask, and eye protection such as sealed goggles can prevent your body from coming in direct contact with mold spores.
- Working in a well-ventilated area and keeping your car doors and windows open during the cleaning process will ensure frequent air circulation which will keep you protected from mold spores.
- Remove your leather car seats if possible. This will ensure you can target mold on each inch of the seat surface with ease and also prevent it from possibly spreading. If they can’t be removed, ensure to properly cover non-affected areas.
In this article, we will discuss the best techniques for removing mold from your leather car seats. We will also share some safety precautions that you should consider, in order to keep yourself safe and well-protected during the cleaning process.
1. Select or Prepare a Cleaning Solution
The first step in the cleaning process is to prepare an appropriate leather cleaning solution and there are numerous options to choose from. You can either buy a dedicated leather cleaner from a store or opt to make your own cleaning solution at home.
When it comes to cleaning leather, it’s important to select products that are specifically formulated for leather and compatible with its unique properties. Otherwise, this may lead to irreversible damage to the material.
Below, we’ll take a closer look at selecting a suitable leather cleaner and a homemade cleaning solution.
Selecting a Store-Bought Leather Cleaner
While you have the option to choose any suitable cleaning product that is compatible with leather, we highly recommend Leather Honey to remove mold from your leather car seats. This product has effective cleaning ingredients and is also non-toxic. It also doesn’t need to be diluted before use and can be applied straight from the bottle.
If you’re planning to use another leather cleaner brand, you must ensure it is suitable for all leather colors. If you’re unsure about any product, you can always refer to the product description for more information.
Creating a Homemade Cleaning Solution
You may also opt for a homemade cleaning solution that can be quickly prepared. An effective mold remover for leather consists of equal parts water and isopropyl alcohol (70% concentration). You can mix them into a bowl or a spray bottle.
If you don’t have any isopropyl alcohol available, you can prepare a different cleaning solution by combining water and white vinegar instead. To make this solution suitable for leather, we recommend diluting it with water in a 1:1 ratio.
Both isopropyl and vinegar possess effective antifungal properties which enable you to remove mold and also prevent it from further spreading onto other parts of your car’s interior.
2. Prepare Your Leather Car Seats
Next, you’ll need to prepare your leather car seats for the cleaning process. If your car seats can be removed, you should opt to do so. This can greatly reduce the likelihood of mold spreading to other parts of your vehicle interior during the cleaning process.
However, if your car seats can’t be removed, you can open all the vehicle’s doors and windows to provide better ventilation. Also, remember to cover parts of your car’s interior around the seats to protect it. This includes the doors, center console, floor, headrests, and other components.
3. Vacuum the Car Seats
Start the cleaning process by using a vacuum cleaner. We recommend using a handheld one with a brush attachment. This will ensure that the surface is adequately cleaned and that some of the surface-level mold spores are removed in the process.
Be sure not to vacuum the seat covers too aggressively as doing so may transfer the mold spores from your seats to other parts of the interior.
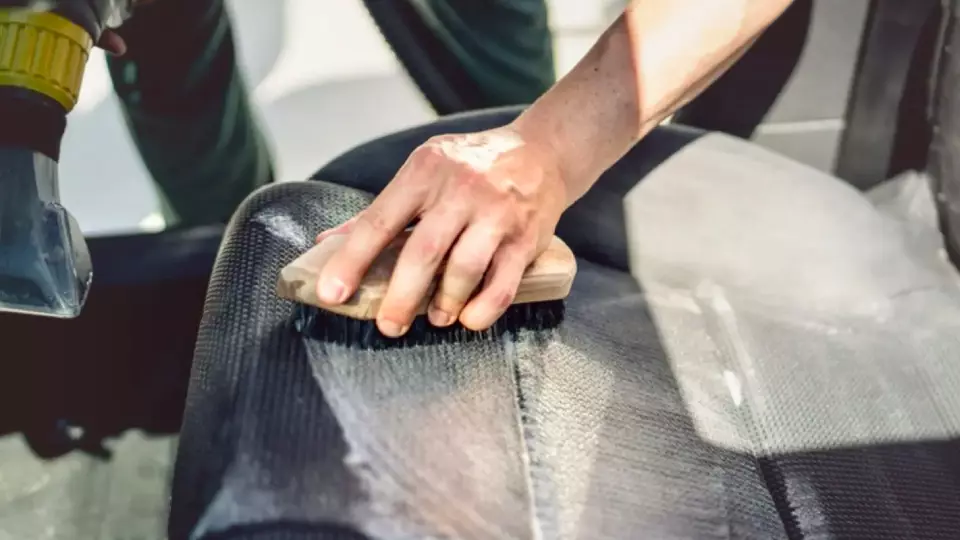
4. Clean the Mold Off the Leather Car Seats
Before applying the cleaning solutions to the entire surface of your leather car seat, consider testing it in a small and inconspicuous area such as the side of the seat. This will help you determine if the cleaning solution is suitable or if it will discolor or damage the leather’s surface.
Once you have confirmed that the cleaning solution is suitable, you should apply it to the rest of the seat surface as described in the process below.
- Apply the Cleaning Solution
Use the spray bottle to dispense the cleaning solution onto a clean cloth or a sponge. Microfiber cloths are especially useful for such cleaning tasks, as they won’t damage your leather seats. Be sure to apply enough cleaning solution to dampen the cleaning cloth or sponge, but not too much to avoid saturating the leather with it. - Gently Clean the Affected Areas
Use the dampened cloth or sponge to slowly and gently wipe the car seat areas where mold is visible. Next, brush the crevices and hard-to-reach spots with a soft-bristled brush or a toothbrush to clean them. Ensure you clean the entire affected area, working in small sections during each round of cleaning. This will ensure you don’t miss any moldy spots. - Rinse the Leather Car Seat with Clean Water
Wet a different cloth or sponge with water and then wipe away the excess cleaning solution from the leather seats. Leaving any residue on the seats can potentially cause long-term damage to the leather surface over time.
5. Condition Your Leather Car Seats
After you’ve successfully removed the mold from your leather car seats, it is crucial to condition them by applying a specialized leather conditioner to the surface. This is because the cleaning solution can potentially dry out the leather, leading to cracks.
A conditioner, such as the Weiman Leather Conditioner, plays a vital role in preserving the leather’s pristine appearance and flexibility, making look at good as new. Ensure that the conditioner you select is formulated to treat leather.
6. Let Your Leather Car Seats Dry
The concluding stage involves allowing your leather car seats to thoroughly dry, which entails utilizing a clean and dry cloth to absorb any residual conditioner present on the leather seat’s surface.
If you’ve removed your car seats then it’s best to place them in a dry and adequately ventilated area. If your seats couldn’t be removed, you should park your car in a shaded area with adequate ventilation.
Keep in mind that you should always avoid parking your car in sunny areas as direct sunlight can cause the leather’s color to fade and the material to dry out and crack. To expedite the drying process, you can even consider positioning a fan in proximity.
Make sure to wait until your leather seats are completely dry before using them, as failing to do so can cause mold to regrow and spread.