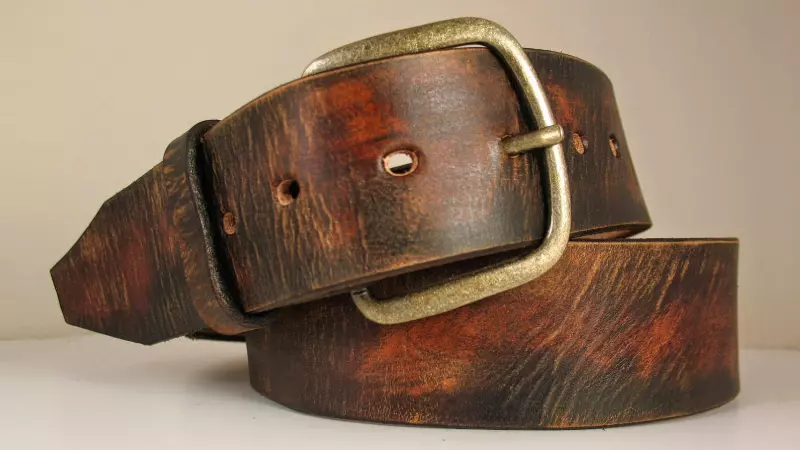
How to Distress a Leather Belt: A Simple 6-Step Guide
A new leather belt might not have the same appeal as a polished and well-maintained old leather belt with a unique patina. People who like wearing leather understand its appearance usually gets better with age.
Therefore, many people take a shortcut by distressing their leather belts to add character and personality to them. Here’s a simple 6-step guide on how to distress leather belts:
- Apply Rubbing Alcohol On Leather Belt
- Crease Your Leather Belt
- Sand Your Leather Belt
- Buff Your Leather Belt
- Apply Finishing On Your Leather Belt
- Sand Your Leather Belt
Keep in mind, that you are able to distress your leather belt and create a rugged look without including the second step of the process. However, we find that the crease formation does help round off the look to be more authentic and natural. It is certainly entirely within your judgement as to whether you want to follow our guide perfectly or modify it to your own preferences.
1. Apply Rubbing Alcohol Across Your Leather Belt
Rubbing alcohol can be used to dampen the leather material and make it more vulnerable to different distressing techniques that we will be covering. You can either soak your leather product in rubbing alcohol lightly or spray it on the surface of your belt sufficiently.
Leave the alcohol on the belt for a short while to allow it to absorb the chemicals. This will allow for the belt to be ready for the next step.
2. Create Creases on your leather belt
After you have applied the rubbing alcohol and the belt is still damp to the touch, begin squeezing, wringing, scratching, folding, and beating up the leather belt. This abuse will create the desired crease marks on the leather and give it a natural beat-up appearance. Following are some of the ways you can achieve that look:
Clothespins
Fold or bundle up the leather belt awkwardly and randomly to hold the creases in place using clothespins. Leave the clothespins attached to the folds of the leather belt for a short period to create creases.
As we are going for a rugged, natural look, try to ensure that you are not folding your belt in a uniform manner. We recommend alternating the distances between intended crease marks to introduce a more natural look.
Feel free to also introduce diagonal folds into the equation, we do not want to end up with only vertical crease marks. Once again, this is to ensure that your end visual result looks as organic as possible.
Hammer
Bend or fold your leather belt and hammer it heavily to create creases on the material. If possible, try and use a hammer with a rounded head, if possible.
As you’re going to be introducing significant force to the leather belt, we want to ensure that you do not run the risk of tearing or cutting the leather. Needless to say, you want to avoid instruments such as a pickaxe as that can cause irreversible structural damage to your belt.
Weights
Bundle up the leather belt and place it under some heavy weights for a considerable time to create long-lasting and deep creases. The pressure from the weight will cause the leather belt to develop natural creases.
For lighter and more creases, you can readjust the folds of the leather belt after small intervals of time and place it again under the weight.
3. Sand Your Leather Belt
Use a 320-grit sanding block or sandpaper first to lightly sand down the original surface of your leather belt. Sanding creates a naturally distressed and roughened look for your leather belt and can also help bring out scars in the material.
Repeat the same process gently with a 400-grit sanding block or sandpaper for a smooth, yet seemingly aged and worn texture. This is known to be one of the most effective distressing techniques for leather belts.
4. Buff Your Leather Belt
After sanding down your leather belt, use a wool buffing pad on the belt to remove any excess dust or leather debris. It is best to never compromise on the quality of the leather material or the tools you need to upkeep it.
Therefore, you should choose a good wool buffing pad to remove excess dust from the belt and rub away all superficial scratch marks.
5. Apply Finishing on Your Leather Belt
To produce a sheen on your leather belt, you must apply a finishing product after buffing it. We recommend using a single thin coat of finishing product to bring out the sanded texture and adding a lustrous finish to the belt.
While you’re able to use any suitable leather finishing product, we typically use Fiebing’s Antique Finish for this. We recommend it because it gives your leather belt a mellow and distressed look, without an overpowering finish or gloss.
Ensure not to use too much finishing product since it can give your leather belt an overly plastic-like shine. This will cheapen the overall look of your belt which you definitely want to avoid.
For a sophisticated, aged look on your leather belt, we recommend working towards an aniline or semi-aniline finishing.
Aniline Finishing
Perfect for full-grain leather, aniline finishing can only be achieved for the best quality of leather. It exposes the natural coloring, wrinkles, patterns, and pores of the leather. It has a similar effect to staining and can allow the material to be breathable while sustaining a worn patina.
Semi-Aniline Finishing
A semi-aniline finishing acts as a corrective layer which is a combination of aniline finish and pigmentation. It provides a slight sheen while removing unsightly blemishes on the material, such as insect bites on the original hide and differences in textures and color. It also offers more durability, stain resistance, and less overall maintenance for your leather products.
6. Sand Your Leather Belt
Finally, use a finer sanding block or sandpaper (600-grit) to lightly buff over the dried finish on your leather belt for a smoother and more natural shine. Buffing with finer sandpaper removes the excess shine on your leather belt for a beautiful vintage and worn appearance.