How to Use a Leather Groover
A leather groover, also called stitching groover, is a leatherworking tool that creates grooves (also referred to as channels) in your leather. These grooves are ideal to rest stitches or act as marking lines. They can also be used as folding points or just purely for decoration purposes.
In order to take advantage of this, you’ll need to learn how to use this tool correctly. Follow the steps below on how to use a leather groover:
- Set Up Your Leather Groover
- Prepare Your Leather Piece
- Place Groover Against Leather Piece
- Apply Pressure and Create Groove
This guide aims to teach you a little bit about leather groovers and also show you how to properly use them. We’ve also made sure to provide a maintenance guide, as well as some useful tips that you can apply when using leather groovers.
What Is A Leather Groover?
It’s important to note that leather groovers come in various shapes and sizes. Therefore, it’s best to acquaint yourself with them first, before proceeding to use them.
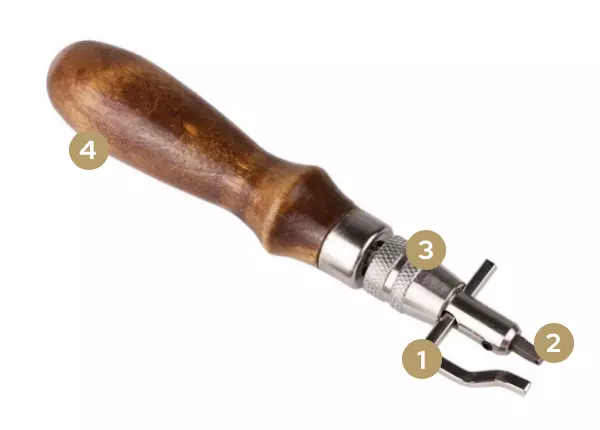
Leather Groover Parts
- Angle cutter head
- Scribing Head
- Chuck
- Handle
A leather groover, also called stitch groover, is an easy-to-use leatherworking tool that creates grooves at the edges of your leather piece. While the main function of a leather groover is to create stitching channels, it can also be used to create folding or marking lines.
Let’s talk a little about the important parts that make up a leather groover. Here’s what they are:
- Handle – The handle is designed in a way so that the leather groover sits comfortably in your hand. It’s typically made of wood and features an ergonomic design.
- Chuck – The chuck is a tightening device that is located towards the bottom of the groover and secures the angle cutter head in place.
- Angle Cutter Head – The angle cutter head, also called a guide arm, acts as a guide that presses against the edge of your leather piece.
- Scribing Head – The scribing head or cutting head, is the part that creates the groove in your leather by removing the top part of the leather.
You may also notice that most stitch groovers come with multiple attachments, such as edge bevelers. However, this guide will strictly focus on explaining how to use a leather groover. Let’s get started!
How To Use A Leather Groover
Now that you know what each part of the leather groover does, let’s get started by learning how to use it. Make sure to follow the steps below and feel free to skip steps that aren’t applicable to you.
1. Set Up Your Leather Groover
Before you start using it, you’ll need to set it up properly. Most leather groovers don’t come assembled out of the box, so you’ll need to assemble it yourself. Don’t worry, this is easy!
Simply place the chuck onto the groover and slide in the angle cutter head. Don’t tighten it just yet. Now place the scribing head into the tip and tighten it using the hex screw.
It’s best to set your stitch groover up to be used with your dominant hand, as this gives you more control over it. The straight side of the angle cutter head should point to the side where your thumb is located, and the angled side where your index finger is.
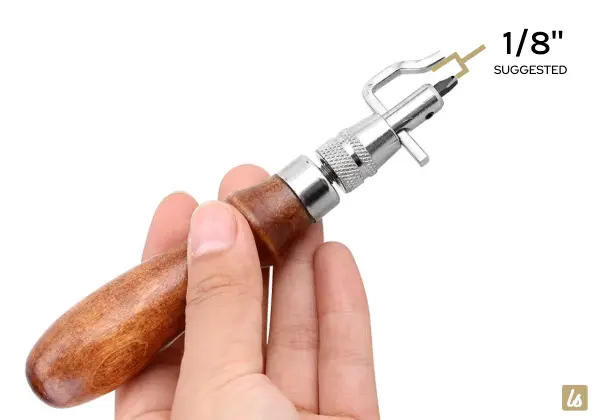
Now, set the angle cutter or the guide arm in place by turning the chuck of the leather groover. There are various different distances that you can use to create grooves in your leather. The distance is measured from the inner side of the guide arm to the center of the scribing head.
Recommendation: We recommend creating a groove that is 1/8″ from the edge. This is the sweet spot, where the stitching provides the most stability, but you’re free to use what you’re most comfortable with.
2. Prepare Your Leather Piece
Now it’s time to prepare the leather that you intend to use the stitch groover on. The great news is that leather groovers work on all shapes of leather, square, circular, rectangular or any other type.
However, take note that you may run into issues creating a stitch channel if your leather is too thin. Too thick and you’ll have trouble creating the stitches, so ensure that it has an adequate thickness.
Simply cut out the piece you want to create grooves for and ensure that it has the right thickness and you’re ready for the next step.
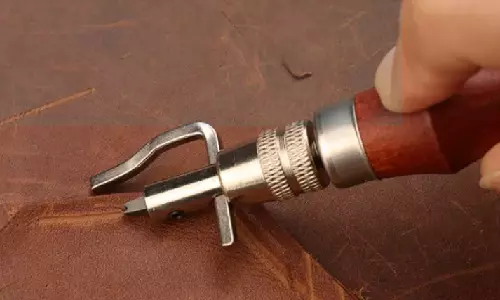
3. Place Groover Against Leather Piece
Now, it’s time to place the inside of the guide arm or the angle cutter head against the leather piece. Ensure that you choose an appropriate distance between the edge of your leather and the groove.
If the stitching is too close to the edge, it may not hold very well and if the stitching line is too far from the edge, it tends to damage the leather edges over time. Therefore, we would recommend a distance of exactly 1/8″, but use whatever you prefer.
When holding the leather grover, place your index finger on the top of the chuck or the metal part of the handle, and your thumb on the inside of the groover further up the handle.
4. Apply Pressure and Create Groove
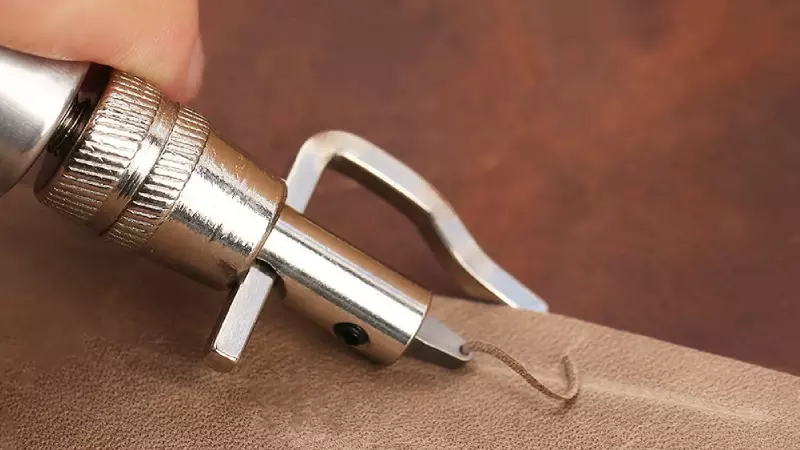
Now, apply moderate pressure on the groover and slide it down along the entire leather edge. As you start moving the leather groover, you’ll see that the access leather will automatically be removed, as it creates the stitch channel.
At all times, you should ensure that the guide arm makes contact with the edge, so that you’ll be able to create a straight and evenly distanced groove. Start moving the groover down the edge in a relatively fast motion.
Using slow motions may cause the guide arm to shift, creating an uneven channel. If you’re using a stitch groover for the first time, it’s best to practice on scrap leather pieces first, in order to get the hang of it.
Why You Should Use a Leather Groover
While the main purpose of grooves is to seat stitching lines, they can also have other functions. Read on to get a better idea what you’ll be able to do with this handy leatherworking tool!
- Stitching Lines – By far the most common use for leather groovers is to create a groove line for the stitches. These grooves protect the stitches, as they sit embossed in the leather.
- Folding Lines – Deeper grooves may also be used as folding lines. As the leather is thinner at the groove lines, your leather piece can be more easily folded.
- Marking Lines – Light grooves may also be used to create straight marking lines that can be used as stitching guides or other purposes.
Leather Groover Maintenance
As leather groves are simple leatherworking tools, they need very little maintenance. In fact, the only maintenance that we do for our stitch groovers is sharpen the cutting head after a few months of use.
There are various cutting head sharpening methods available and you can also easily replace leather groovers as they are very affordable.
Useful Tips When Using a Leather Groover
In this section, we’ll be sharing some of the most useful tips that you can apply, when it comes to using leather groovers. We’ll share what you should make sure to follow and also potentially avoid.
- Use an Appropriate Gap – Make sure that you don’t create a groove that’s too close or too far away from the edge. We recommend using a groove distance of 1/8″.
- Use Thicker Leather – Leather that’s too thin will rip apart when trying to create a groove. Therefore, use leather that is slightly thicker.
- Don’t Cut Grooves Too Slowly – When draggin the leather groover along the edge, try to maintain a moderate or fast speed. Cutting the groove to slow may create an uneven channel.
- Make Sure the Groove Is Deep Enough – Plan ahead when it comes to stitching. If you’re stitching with thicker thread or multiple times, your groove lines should be deeper.
- Repeat Grooving If Required – If your initial groove line isn’t deep enough, simply repeat the process. Although we recommend doing it only once, but correctly, you’ll be able to do it multiple times on the same line if required. Just ensure that you keep a consistent line.
That’s all there is to it! Practice these steps while keeping the above mentioned tips in mind and you’ll have mastered the art of creating grooves with a leather groover in no time!