How to Use a Leather Sewing Awl
When it comes to crafting high-quality leather products, well-executed hand stitching is extremely important. Using a leather sewing awl is the best way to ensure a clean stitch across your leather.
In 7 simple steps, you’ll be able to master stitching using a sewing awl. Here’s a quick guide on how to use a leather sewing awl:
- Prepare the Leather Sewing Awl & Setup Workspace
- Drive the Leather Sewing Awl Through the First Hole
- Pull the Right Amount of Thread from the Back
- Retrieve the Leather Sewing Awl from the Same Hole
- Push it Through the Next Hole and Form a Loop at the Back
- Continue Stitching Through All Holes
- Backstitch, Cut the Access Thread and Burn the Ends
Before we start, it’s best to familiarize yourself with the leather sewing awl and all of its components, so that you can follow each step accordingly.
What Is a Leather Sewing Awl?
A leather sewing awl is a hand-held sewing tool that is used in leather crafting. It is used to pass a thread through each hole, in order to join two pieces of leather together.
A leather sewing awl contains 4 parts that you’ll need to familiarize yourself with, as you’ll need to set up your awl in the first step. The sewing awl contains a handle, bobbin, chuck and needle.

Leather Sewing Awl Parts:
- Handle
- Bobbin
- Chuck
- Needle
- Handle – The handle is where you hold the leather sewing awl and typically contains a storage compartment, where a small wrench for the bobbin bolt is stored.
- Bobbin – The bobbin is a small spool with a thread. This thread is used for the stitching process. On some sewing awls, the bobbin is located inside the handle.
- Chuck – The chuck is a cap that is screwed onto the hole near the bobbin. It feeds the thread from the bobbin to the needle.
- Needle – The needle is a sharp object that is designed to penetrate through the holes of the leather. It contains an eye towards the bottom, where the thread is passed through.
How to Use a Leather Sewing Awl to Craft Leather
Understanding how to properly use a leather sewing awl will enable you to become a great leather crafter. As the detail is in the stitching, you should pay close attention to the following steps.
1. Prepare the Leather Sewing Awl and Setup Your Workspace
The first thing you’ll need to do is prepare your leather sewing awl. Simply remove the cap of the wooden handle and take out the wrench. Remove the bolt of the bobbin and take the spool with the thread out of the awl.
Now, simply feed the thread through the chuck, reattach the bobbin and tighten the bolt back into place. You’ll now have to insert the needle into the end of the chuck and insert the thread into the eye of the needle. Also make sure that the thread runs down the groove of the needle.
Your awl is now ready to be used! You may also take this opportunity to set up your workspace. It’s recommended to either use a stitching pony or a protective surface to stitch on, in order to avoid damage to your table top.
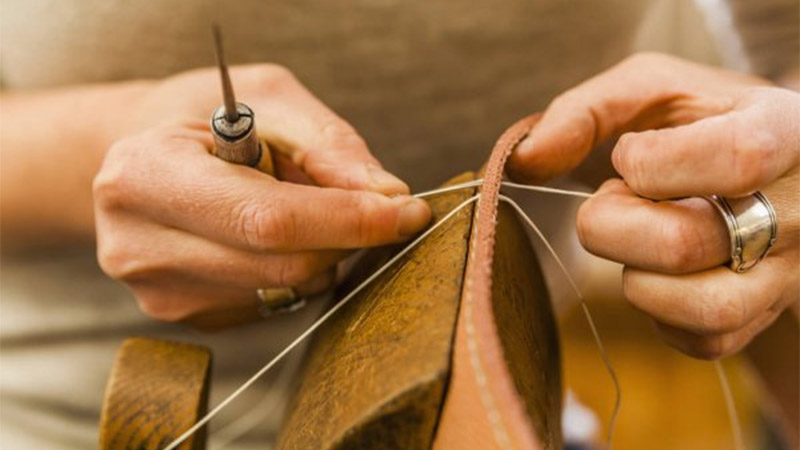
2. Drive the Leather Sewing Awl Through the First Hole
Push the needle of the sewing awl through the first hole of the leather, until about half of the needle sticks out the backside. When you drive the awl through the leather, ensure that you keep your other hand away.
This is particularly important if you aren’t using a stitching pony and are holding the pieces of leather with your other hand. If you are using a stitching pony, try to clamp it about 1/4 of a inch away from the holes.
3. Pull the Right Amount of Thread from the Back
With the needle halfway through the hole, pull enough thread out of the back to cover the entire area that you plan to stitch. It’s always advisable to use a tolerance of about 20%. This means that if your entire stitching area is 10 inches, you should pull out about 12 inches of thread.
The reason for this is because you’ll need to account for the stitching path, as well as the backstitching process to finish off the stitching. Also remember to pull the end of the thread out the back.
4. Retrieve the Leather Sewing Awl and Push it Through the Next Hole
Now, pull the sewing awl of the same hole that you have inserted it into and ensure that the end of the thread remains on the backside of the leather. You can do this by holding it down with your other hand.
Simply point the awl to the next hole and and drive it through. This time, push it all the way through, then pull it back slightly until the needle of the awl is about halfway through. You see that backing the awl up created a small loop on the back.
5. Form a Loop at the Back of the Leather
You’ll now need to pay close attention, as you will need to create a lock stitch. Feed the end of the thread through the loop that you have created. Ensure to feed it all the way through.
When you pull the leather sewing awl out of the second hole, you’ll notice that you’ve created a tie that secures the stitch. This tie is known as a lock stitch.
6. Continue Stitching Through All Holes
Simply repeat this process across all of the holes in the leather and ensure that you form a tight lock stitch on the back of each one. While these first few holes may take some time to get used to, you’ll be able to get better at this over time.
Also ensure that you feed the entire thread through each loop.
7. Backstitch and Cut the Access Thread
Once you’ve reached the last hole, you’ll need to ensure that the entire stitch is secured. You will be able to do this by backstitching. Backstitching is the process stitching backwards from the last hole to the previous hole.
This will ensure that the ends are tightened securely. You’ll only need to backstitch about 2 – 3 holes. Now, pull out the leather sewing awl out a final time and cut off the thread on both ends.
Finally, you should burn both ends of the thread (one should be sticking out on the front and the other out the back). This will melt the ends down and make it blend in nicely with the stitch.
Why You Should Use a Leather Sewing Awl
While stitching leather with a machine may save you a bit of time, it doesn’t give you as much control over the stitching process like an awl does. Using a leather sewing awl gives you complete control of every single stitch and ensures a beautiful stitch pattern across your leather.
Additionally, it also allows for a more detailed and precise sewing pattern. Each stitch allows you to closely monitor the pattern all the way through. Here are some of the benefits of using a leather sewing awl:
- Better stitching control
- More accurate stitches
- Personalized touch
Do You Need to Maintain a Leather Sewing Awl?
Sewing awls can last for a very long time. However, you should check the condition of your leather sewing awl before starting the stitching process. Using a leather sewing awl, can dull your needle over time. You can simply replace a dull needle with a new compatible one.
At the same time, you should also check the bobbin, and the other components from time to time, before you start stitching.
Do Leather Sewing Awls Use Different Types of Needles?
There are two types of needles that are typically used for stitching leather, a straight needle and a curved needle. Note that you will be using a straight needle most of the time, when sewing two pieces of leather together.
There are also curved needles that are used when you have no access to the backside of the leather. Curved needles are also used with leather awls, but are mainly required for leather repair, which is not covered in this process.