How to Use a Stitching Pony
A stitching pony is a great tool for leather crafting and helps to keep your leather piece in place when stitching. While you’re still able to craft your leather items without this tool, a stitching pony simplifies and speeds up your stitching process.
This guide will teach you a simple step-by-step guide on using a stitching pony for leather crafting and what to look out for when using one. Here’s a quick summary on how to use a stitching pony:
- Ensure Your Stitching Pony Is In Good Condition
- Assemble Your Stitching Pony
- Secure Your Stitching Pony in Place
- Place the Leather Piece Between Both Clamps
- Start Stitching Your Leather
- Remove Your Leather Piece
- Keep Your Stitching Pony
When you follow this tutorial, ensure that you keep a clean and neat workspace.
1. Ensure Your Stitching Pony Is In Good Condition
The first thing you’ll want to do is check if your stitching pony is fit for use and that everything is in working order. While these tools generally last fairly long, they can wear over time. Therefore it’s best to check the condition before you use it.
Here is a quick list of items to check before setting it up:
- Functionality of clamps
- Nut that secured the clamp to the base
- Tightening Wrench
You should inspect each of these items before you assemble your stitching pony, and also after you’ve assembled it.
2. Assemble Your Stitching Pony
You can now proceed to assemble your stitching pony. It’s recommended that you follow the instructions in the user manual, however feel free to use the general instructions below for easy reference.
Putting together a stitching pony is extremely simple and straightforward. Firstly, assemble the clamps and the clamp tightening screw or wrench. Most of the time, this step is already completed and you won’t need to do this, unless you’ve bought a new set.
Then, place the two clamps on top of the base and secure them using the bolt and the wing nut. You’ll need to make sure that the screw is tightened securely, as the clamp may dislodge during stitching if you haven’t done so.
3. Secure Your Stitching Pony in Place
Now that your stitching pony is all set up you can decide on where you want to place it. The two of the most common and effective locations are using the stitching pony on top of a workspace or between your legs in a seated position. Both options are great and you should pick according to your preference.
If you’re going to use a table top, you’ll need to use a clamp to hold it down. Firstly, ensure that your tabletop and your workspace is clean and that you have enough room for the stitching pony.
Then, use a simple camp and place it on your stitching pony. This will hold it firmly in place.
Another option is to place it in between your legs. As you can see, stitching ponies are either attached to the middle or the end of the base. If you plan to use a stitching pony between your legs, then it’s recommended to use one that is attached to the middle of the base.
However, you can use both with no issues. Simply place the base of the stitching pony underneath your leg or legs (depending on where it’s attached to on the base). If it starts moving when you’re stitching, simply move it closer to you.
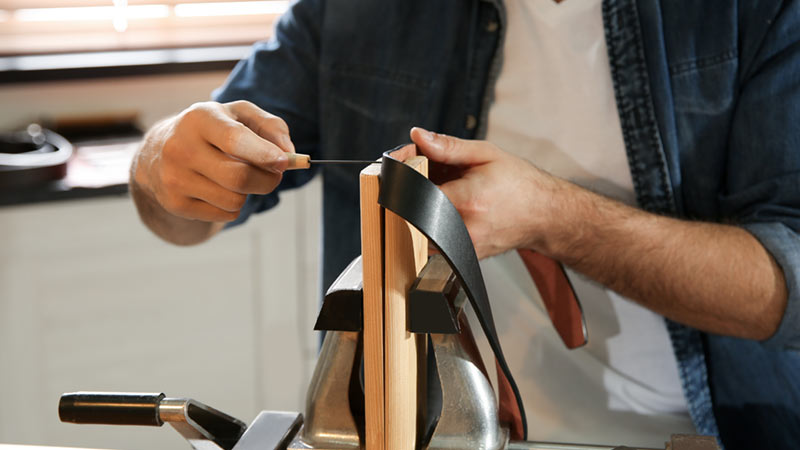
4. Place the Leather Piece Between Both Clamps
Now, you’ll need to place your piece of leather in between both clamps. You may also do this step before securing your stitching pony in place. It’s completely up to your personal preference.
After you have done so, you’ll need to lock the clamps together so that it’s firmly in place. Typically, there are two types of clamp tightening systems.
The first one uses a wing nut. To tighten the wooden stitching clamps, simply twist the wing nut in a clockwise direction. To remove your leather piece, simply untighten the wing nut.
The second type uses a clamp. To tighten the wooden clamps together, simply press down the steel tightening clamp. To release it, pull the clamp back up.
5. Start Stitching Your Leather
You can now start your leather stitching process using a leather stitching awl or though the hand stitching technique. When you start stitching ensure that your stitching pony is secure and isn’t moving.
If it’s moving, either tighten the clamp that’s holding the stitching pony on the table, or move it closer to you if it’s placed in between your legs.
6. Remove Your Leather Piece
After you’ve completed your stitching process, you should remove your leather piece from the stitching pony. Simply release the metal clamp (holding the wooden clamps together) or turn the wing nut counterclockwise.
This again depends on the type of stitching pony you have. Do this gently, as you don’t want to break any parts.
7. Keep Your Stitching Pony
Now that you’ve completed your stitching process and also removed your leather piece, you can remove it from your seat or from your workspace. Once you have done that, you may disassemble it and keep it in a storage box or drawer.
Take note that this step is completely optional. If you have a large workspace or a permanent leather crafting setup, you may not want to disassemble your stitching pony.
However, you should always remove the clamp that holds your stitching pony on the tabletop, as well as the clamp or nut that tightens the wooden clamps.
You should ensure that there is no tension on your tools once you’re done with them, as they can strain the wooden parts. This can ultimately reduce its lifespan.
That’s it! As you can see, using a stitching pony is extremely simple and straightforward. Just ensure that you always remove the clamps and tightening nuts once you are done with your stitching pony!