How To Use Permatex Vinyl And Leather Repair Kit
The Permatex Vinyl And Leather Repair Kit is great for repairing damaged leather items. Using the adhesive and filler, you’ll be able to fix holes, tears, burns, cracks and gouges that may have accidentally damaged your leather.
This repair kit works well on various leather products such as car upholstery and interiors, sofas, bags, furniture, and more. With our 8-step guide, we’ll be showing you how to use the Permatex Vinyl And Leather Repair Kit and what you should pay attention to during the repair process.
Here’s a quick overview of the 8-step process:
- Unpack the Repair Kit
- Clean Damaged Leather
- Insert Cloth Backing Fabric (Only If Required)
- Fill Damage with Adhesive & Filler
- Mix & Match the Color of Your Leather
- Apply the Color Repair Compound
- Select the Correct Grain Paper
- Heat Cure The Compound
We have also created a comprehensive Permatex Vinyl And Leather Repair Kit Review, if you’re interested to find out more about the individual contents of this kit, what’s in the ingredients list and more. Let’s get to it!
1. Unpack The Repair Kit
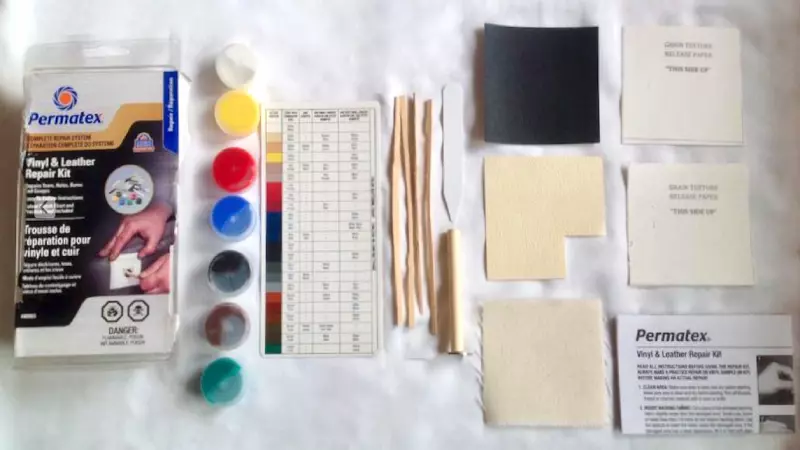
Firstly, open the Permatex Vinyl And Leather Repair Kit and take out all of its contents. It’s best to lay out all of the items in front of you – preferably on a workbench or on the floor, if you’re working on larger leather products.
The repair kit itself contains a total of 8 items, which can be found below:
- Heat Transfer Tool
- 7 Colors of Repair Compound
- Clear Adhesive and Filler
- Grain Pattern Paper
- Cloth Backing Fabric
- Plastic Spatula
- Instruction Sheet
- Color Matching Chart
2. Clean Damaged Leather
Before you start repairing your damaged leather, you’ll need to clean it first. Start by cleaning around the damaged area, so that it’s free of dirt, grime and stains.
To do this you can use any type of household cleaner that is compatible with leather. One of our favorite cleaning solutions is the Leather Cleaner by Leather Honey, as it’s all natural and gets rid of any impurities very easily.
Next, use a lint-free cloth or a sponge to clean the damaged area (hold, cut, gouge, or tear), as well as about 2 – 3 inches around it. A simple and quick clean will do the job!
Important Tip: If you’re dealing with tears or burns, make sure to cut off any frayed fibers or burnt sections with any sharp object. The edges of the damaged leather should be clean and smooth.
3. Insert Cloth Backing Fabric (Only If Required)
The kit comes with a cloth backing fabric that you can use to support the damaged area. This fabric essentially supports the filler if the area is larger than about 1/4 to 1/2 an inch (slightly larger than 0.5 – 1cm).
This means if the damaged area is smaller than about 1/4 to 1/2 an inch, you won’t need to use the cloth backing and you can safely skip this step. If it’s larger then cut out a piece of cloth backing fabric that is slightly larger than the damaged area.
Then, use the plastic spatula that was included to push the fabric underneath the damaged area. If there was previously foam underneath your leather that left a depression, simply fill it with cotton or any similar material first.
4. Fill Damage with Adhesive & Filler
Next, locate the adhesive and filler tube. Squeeze out enough so that the entire damaged area is filled. Also ensure that the surface is evened out using the plastic spatula.
If you’re dealing with a larger damaged area, such as holes and ruptures where you used a cloth backing fabric, then ensure to apply adhesive and filler underneath the leather parts that are in contact with the fabric.
This will ensure that it’s held firmly in place and doesn’t dislodge after the repair. Now, you’ll need to let it naturally dry for about 4 hours. Take note that the adhesive may shrink a little as it dries.
This is completely fine, as this recess makes space for the color repair compound that you’ll need to use in the next few steps.
5. Mix & Match The Color Of Your Leather
Included in the kit, you’ll see 7 small cups containing different colors. You’ll be able to use a combination of these colors to match the color of your leather. To get the best results, you should use the color matching chart.
Simply hold this chart against your leather to determine which color combination is required. Use the spatula to stir the color mixtures. If your leather color can’t be found, take the closest shade you can find and use the reference below:
- To Lighten: Add white color
- To Brighten: Add yellow color
- To Darken: Add black and/or brown color
Make sure to use the correct combination and ratios to mix your colors. When lightening, brightening or darkening, only use small amounts.
6. Apply the Color Repair Compound
In the next step, you’ll need to apply the color repair compound that you mixed together and apply it to the damaged area. Please only proceed with this step, once the adhesive application is completely dried.
Use the spatula to evenly distribute the color repair compound and ensure that it leaves an evenly distributed layer. Here, it’s okay to slightly overlap the compound with the edges of the leather to create a seal.
Important Tip: Ensure that the surface is evenly layered and not bulging outward. Overfilling will unnecessarily spread the compound over parts of the leather that are not damaged.
7. Select The Correct Grain Paper
The grain papers that you see in the kit give the repair compound the texture that matches your leather. Therefore, you’ll need to select a texture that comes closest to that of your leather.
Fine
- For fine leather textures
Medium
- For medium leather textures
Course
- For coarse leather textures
8. Heat Cure The Compound
The heat curing process is designed to cure and also apply the texture to the color repair compound that is covering the damaged leather. This is by far the most important and also intricate step, so please pay careful attention.
Prepare the Heat Transfer Tool
Use an iron and set it to the maximum heat setting for about 5 minutes. Next, place the head transfer tool against the iron for about 2 – 3 minutes. This should heat the tip to the correct temperature.
Apply Heat Onto the Grain Paper
Use the selected grain paper (fine, medium or course) and place it against the damaged area. Take note which side states “This Side Up” and ensure that you place the correct side upward.
Use the heat transfer tool and slide it across the grain paper in small circular motions across the damaged area. Make sure that you cover the entire damaged area and also along the leather edges to ensure proper curing. This step should take about a minute only.
Let the Grain Paper Cool Off
After applying heat, you’ll need to let the grain paper cool off before removing it. The cooling process should take about 2 minutes. Now, examine the repair carefully and repeat this process if the damaged area is not completely dry yet.
After you have completed the process and you feel that there are still areas that you need to touch up, you may do so. Ensure that you also apply the curing process. We’ve included a video above that you may follow for reference.