How to Fix a Peeling Leather Steering Wheel
Caring for your leather interiors in a car is slightly trickier than your average leather care routine. This is because your car and its leather interiors will largely get exposed to elements that are out of your direct control.
Sunlight and heat are the two external factors that can cause damage and cracking of leather. While your indoor couch stays hidden from direct sun exposure, it is unrealistic to plan all your driving routes to be shaded.
It is also not uncommon for car owners to care for their leather interiors on a less frequent basis due to space limitations. This also makes the leather caring process much more inconvenient and more of a hassle than anything else.
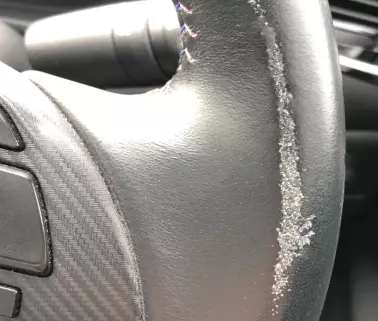
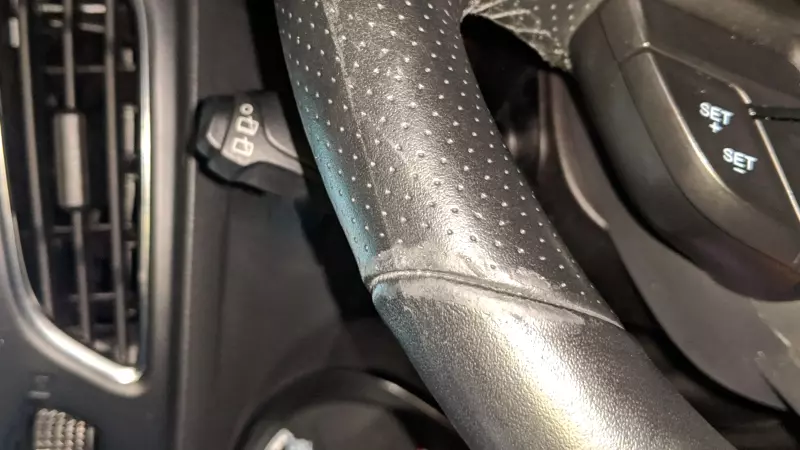
Dirt accumulation can also lead to leather being damaged in the long run. A steering wheel is no different and one of the most actively used components in a car. A mixture of improper, infrequent care as well as exposure to less than ideal elements can lead to a leather steering wheel peeling after prolonged damage.
Prevention is certainly what we recommend over treatment when it comes to your car’s leather steering wheel. Proper care and conditioning routines will hopefully prevent your steering wheel from ever peeling.
However, if you are reading this article, chances are we have crossed that bridge and we are here to help with the treatment cycle. A peeling steering wheel certainly leaps out to the eyes and will make the car look much shoddier than it might actually be.
Whether you want to fix this issue to uphold as much resale value as possible or simply to have your car looking as respectable as it can, this simple guide will hopefully give you the confidence to address the problem of your peeling leather steering wheel.
How to fix peeling leather steering wheels in 8 simple steps:
- Cover Car Interiors Using Tarp & Tape
- Clean Steering Wheel Thoroughly
- Remove Loose Peelings Using Sandpaper
- Even out Steering Wheel’s Surface Using Leather Filler
- Apply Adhesion Promoter to Steering Wheel
- Apply Leather Dye to Steering Wheel
- Apply Leather Conditioner to Steering Wheel
- Dry Steering Wheel
While most cars will allow for steering wheels to be replaced, we will be focussing on the actual restoration of the leather steering wheel itself so that you have this option available should you choose to take it. Feel free to use other creative solutions such as purchasing a steering wheel cover should that suit your purposes.
Meanwhile if you do want to treat the issue at its root cause, here is a list of materials we will recommend for you to have handy before the start of the restoration process.
- Leather Filler
- Adhesion Promoter
- Leather Dye
- Leather Conditioner
- 600 Grit Sandpaper
- 1200 Grit Sandpaper
- Car Leather Wipes & Cleaning Solution
- Tarp & Large Towel
- Tape
- Sponge & Cloth
- Thin Plastic Gloves
Important Tip: We highly recommend that you undertake the leather steering wheel restoration process when you are not planning on using your can within the next few hours.
Fixing a leather steering wheel that is peeling can take a while and importantly, you would want to give the restored steering wheel time to dry thoroughly first. Without further ado, let us look to cover the steps required.
1. Cover Car Interiors with Tarp & Tape
While restoring your steering wheel, you want to ensure that the rest of the car does not get exposed to any unwanted debris or chemicals. Place a tarp over the driver’s seat, covering it fully.
Also ensure that you are also covering and protecting the dashboard and passenger seat as much as possible. If your steering wheel has buttons or decorative trimmings and emblems, apply masking tape over them for protection.
Make sure to follow the rest of the process with the driver’s door open as wide as possible to create separation from the steering wheel as you are restoring it. It gives you much better access around the steering wheel and frees up some much needed space.
2. Clean Steering Wheel Thoroughly
Now that you have protected your car, you can start the process on your steering wheel. Begin by thoroughly cleaning it. In order to do this, use a dedicated leather car cleaning wipe for this purpose.
To get this done, you can consider using the Armor All Leather Wipes or anything that’s similar. That will do the trick! We’ve also written a comprehensive review on Armor All Leather Wipes if you’re interested in reading more about it.
Remember that you want to remove as much dirt and impurities from your leather steering wheel as possible at this stage. If you notice your wipe is getting discolored from the cleaning process, continue this step until the wipe no longer darkens, signifying that most of the surface level dirt has been removed.
3. Remove Loose Peelings using Sandpaper
A 600 grit sandpaper is what we recommend for this step. Using moderate strength, hold the sandpaper against the steering wheel and do full circulation in a clockwise direction to remove remaining loose peelings from your steering wheel.
Next, repeat the process in a counter clockwise direction. Our goal here is to ensure that weakly bonded peelings are removed to ensure that further peeling post restoration is minimized.
Once this process is done, use a leather wipe to remove any sandpaper sedimentation or residue that might be on your leather steering wheel. This step is important before you proceed to the next.
4. Even Out Uneven Surfaces with Leather Filling
Now that we have removed damaged and weakly bonded leather from your steering wheel, it is natural to see that there are uneven surfaces that need attention. This is where your leather filling comes into the equation.
Ensure to wear gloves prior to this step, so that your hands remain as clean as possible through the process. Apply the leather filling to the uneven surfaces, and press down with your gloved fingers to ensure that the application is even to the touch.
Allow the leather filling to dry naturally. Use your 1200 grit sandpaper and go across the steering wheel, using light to moderate strength, fully ensuring a smooth surface throughout your steering wheel. As per before, use a clean leather wipe to go around the steering wheel to remove unwanted sedimentation left by your sandpaper.
5. Apply Adhesion Promoter to Steering Wheel
Ensure that your steering wheel is completely clean before moving on to this step. We certainly do not want external residue bonded to your steering wheel.
While your leather filling application was local to uneven surfaces, we recommend that you use the adhesion promoter across the entire leather steering wheel. Follow any instructions that your Adhesion Promoter comes with to ensure an even application across your steering wheel.
Allow some time for the Adhesion Promoter to fully dry and set in before proceeding to the next step.
6. Apply Leather Dye to Steering Wheel
We want to unify the colors between your steering wheel and the leather filling as much as possible. A leather dye will also restore some shine and texture to your worn leather steering wheel.
Start with a small amount of leather dye application, increasing it slowly to ensure that you are not overly applying the product. You are always able to add more leather dye through multiple applications, but keep in mind that this process is one way. You are not able to remove excess dye post application should you choose to.
To ensure a consistent application, we recommend to use a sponge or a soft absorbent cloth as an application conduit. It’s important to follow any specific instructions from the manufacturer of your leather dye that your product might come with.
Allow your leather dye to dry naturally. This step is important as we do not want you soiling your hands with wet dye the next time you drive your car out.
7. Apply Leather Conditioner to Steering Wheel
Regardless of whether the leather dye you use has conditioning properties or not, we recommend that you apply a layer of leather conditioner post dye application, when it has dried. This ensures that your leather steering wheel is well protected and long-lasting.
8. Dry Steering Wheel
As leather conditioners tend to be slippery to touch, use a dry cloth to remove any excess conditioner that might have remained on your leather steering wheel before you drive or operate your car next for safety reasons.
Before you take your car for a spin, make sure that your newly conditioned leather steering wheel is completely dry. While it’s recommended to let it dry naturally, you can speed up the process with a fan.